

This article contains affiliate links. There is no additional cost to you, and it allows us to continue sharing our experiences with you. We only recommend products we personally use.
Hooking up your RV electric when you get to a campsite is a pretty simple process. The first time Tony did it, he thought, “No problem, how hard could it be?” And honestly, it is not hard. But there are a few things that would be very helpful to know BEFORE you attempt hooking up your RV electric for the first time — things that can save you from blowing a fuse, frying your electronics, or standing in the rain staring at a power pedestal wondering what went wrong.
We have been doing this since 2018, and we still follow the same steps every single time. Here is exactly how we do it.
In this article:
- Before You Plug In
- Know Your Hookup Type
- Dog Bones — Power Adapters Explained
- Why You Need a Surge Protector
- Step-by-Step: Plugging In
- What Can Go Wrong (and What to Do)
- Disconnecting — Do It in the Right Order
- Our RV Electric Hookup Gear
Before You Plug In — Get This Right First
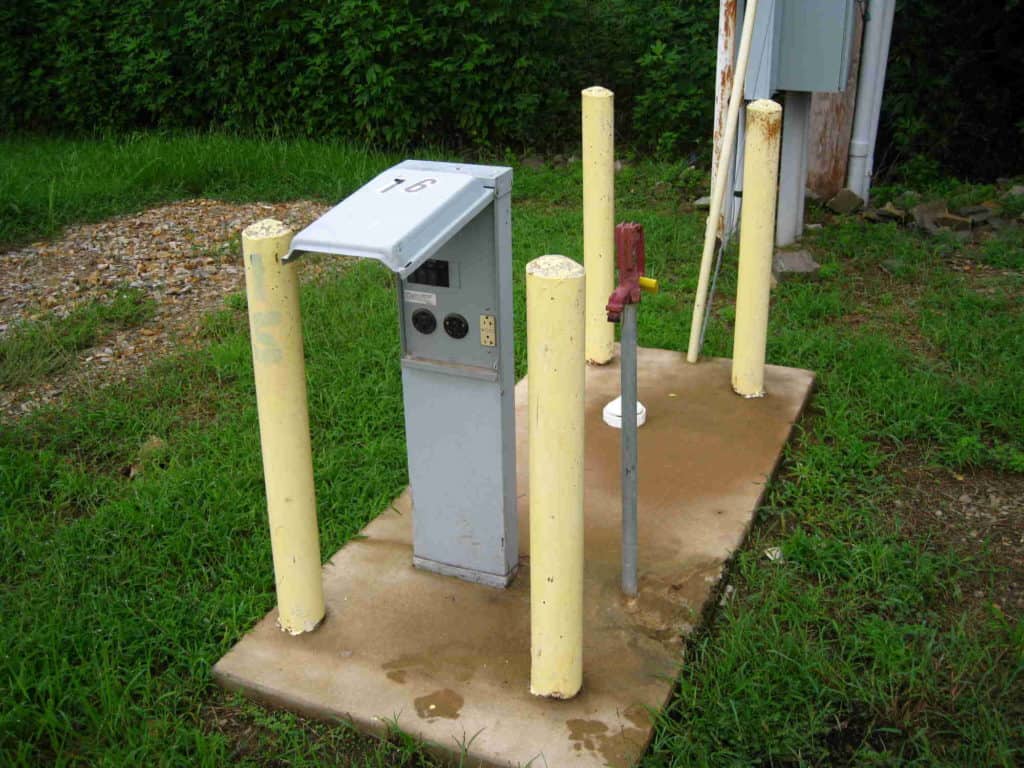
After you have found your site, parked, and leveled your rig, hooking up your RV electric should be one of the first things you do. The process of hooking up your RV electric is straightforward once you understand the sequence. Your RV has been running on battery and propane since you left home. Getting hooked up to shore power means your fridge switches back to electric, your house battery starts charging, and you have lights and outlets for the rest of your setup.
But before you touch anything on the power pedestal, do this:
Check the breaker. Open the power box on the pedestal and make sure the circuit breaker is in the OFF position. This step gets overlooked constantly, and it is the most important one. Plugging into a live circuit can arc, trip breakers, or damage your equipment.
Check your cord length. Before hooking up your RV electric, confirm that your power cord reaches from the pedestal to your rig without any strain. If the cord is stretched tight, move your rig closer. Do not daisy-chain extension cords as a workaround — that creates a fire risk with high-amperage connections. If you regularly find yourself needing more reach, invest in a longer RV power cord rated for your amperage.
Inspect the cord before every use. Look for cracked insulation, exposed wires, melted plugs, or corrosion on the prongs. A damaged power cord can overheat and is a serious fire hazard. If anything looks off, replace it before you plug in.
Know Your Hookup Type — 30 Amp vs. 50 Amp vs. 120V
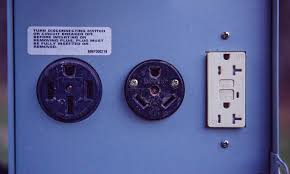
When hooking up your RV electric at a new site, you need to know what kind of hookup is available — and what your rig requires. There are three main types:
50 Amp (NEMA 14-50) — A four-prong outlet that delivers 240 volts across two 120V legs. This is what larger RVs, fifth wheels, and motorhomes typically use. It can run multiple AC units, the microwave, and other heavy-draw appliances simultaneously.
30 Amp (TT-30) — A three-prong outlet delivering 120 volts. This is what most travel trailers and smaller rigs use, including our fifth wheel. You can run one AC unit, the fridge, and basic outlets, but you need to manage your load — running the AC and microwave at the same time will likely trip the breaker.
120V Standard (NEMA 5-15) — A regular household outlet, sometimes available at campsites. Very limited power — good for charging phones and running small appliances, but not for running your RV systems.
Each of these has a different looking plug, so there should be no confusion about which is which. Most power pedestals at campgrounds offer at least two of these options.
Important: Your RV will only draw the amperage it is rated for, regardless of what outlet you are plugged into. A 30-amp RV plugged into a 50-amp outlet (with the right adapter) still only draws 30 amps. But a 50-amp RV plugged into a 30-amp outlet will need careful load management — you cannot run everything at once.
Dog Bones — What They Are and Why You Need Them
If the power pedestal does not have the same outlet type as your RV plug, hooking up your RV electric requires a power adapter. In the RV world, these are called “dog bones” because of their shape — a short adapter cord with different plug types on each end.
We always carry a 30A to 120V adapter in case we end up at a site with limited power options. You want at least one adapter that converts between the two most common types you will encounter.
The key combinations to have on hand:
If your rig is 30 Amp: Carry a 50A-to-30A adapter (so you can plug into 50-amp pedestals) and a 30A-to-120V adapter for emergencies.
If your rig is 50 Amp: Carry a 30A-to-50A adapter. Keep in mind you will be limited to 30 amps of power, so manage your load accordingly.
Adapters are inexpensive insurance. We keep ours in the same compartment as the power cord so they are always accessible.
Why You Need a Surge Protector — This Is Non-Negotiable
A surge protector is not technically required to hook up your RV electric. The National Fire Protection Association recommends surge protection for all RV electrical connections, and we consider it non-negotiable. Here is why: campground electrical systems are old, inconsistent, and sometimes wired incorrectly. We have encountered pedestals with reversed polarity, open grounds, and voltage so low it could damage our air conditioner’s compressor.
A good surge protector does two things. First, it protects your electronics and appliances from power surges — the kind that can fry your TV, microwave, or refrigerator control board in an instant. Second, it monitors the incoming power quality and will cut the connection if it detects dangerous conditions like low voltage, high voltage, or faulty wiring.
We use the Southwire Surge Guard 30A for our fifth wheel. If you have a 50-amp rig, they make a 50-amp version as well. We have used Southwire for years and it has never let us down.
One more thing — surge protectors are expensive, and they hang right there on the power pedestal for anyone to grab. Get a surge protector lock to secure it. We learned this from another RVer at a Florida campground who had his stolen on the first night. A simple cable lock costs a few dollars and prevents a $100+ replacement.
For a deep dive into the different options, we wrote a full comparison: Best RV Surge Protector — Top Selections.
Step-by-Step: Hooking Up Your RV Electric
Here is our exact process for hooking up your RV electric every time, in order:
1. Confirm the pedestal breaker is OFF.
2. Inspect your power cord for damage.
3. Attach your surge protector to the pedestal end of the cord.
4. Attach any needed adapter (dog bone) between the surge protector and the pedestal outlet.
5. Plug the surge protector into the power pedestal.
6. Plug the other end of the cord into your RV.
7. Turn the pedestal breaker ON.
8. Check your surge protector’s indicator lights to confirm power quality is good.
If the surge protector shows an error code, an open ground, or reversed polarity — do not use that pedestal. Turn the breaker off, disconnect everything, and report the issue to the campground office or camp host. Do not try to force it or work around it. Bad power damages expensive equipment.
What Can Go Wrong (and What to Do About It)
Even when hooking up your RV electric with the right process, things occasionally go sideways. Here are the most common issues we have encountered when hooking up our RV electric:
No power after plugging in. Check the pedestal breaker first — it may have tripped. Then check your RV’s internal breaker panel. If both look fine, the pedestal itself may be dead. Report it to the campground and request a different site or a maintenance visit.
Breaker keeps tripping. You are drawing too much power. Turn off the AC and any other high-draw appliances, reset the breaker, and add appliances back one at a time. On a 30-amp connection, running the AC and microwave simultaneously will trip the breaker almost every time.
Surge protector shows an error. Take it seriously. Open ground, reversed polarity, and voltage issues are real problems that can damage your RV. Do not bypass the surge protector to “get power going.” Move to a different pedestal or site.
Melted or discolored plug. This means there was a loose connection creating heat. Replace the cord or adapter immediately. A melted plug is a fire waiting to happen.
Power fluctuations. If your lights dim or flicker, or if appliances behave erratically, the campground may have voltage issues. This is more common at older campgrounds or during peak summer when every site is drawing heavy power. A surge protector with voltage monitoring will catch this automatically.
Disconnecting — Do It in the Right Order
Disconnecting is the reverse of hooking up your RV electric. When it is time to leave, follow this order:
1. Turn off all appliances inside the RV. Especially the AC.
2. Turn the pedestal breaker OFF.
3. Disconnect the cord from the pedestal first, then from the RV.
4. Remove your surge protector and lock.
5. Coil the cord loosely and store it dry. Do not wrap it tightly around your arm — this creates kinks that weaken the insulation over time.
Disconnecting with the breaker still on and appliances running can cause arcing at the plug, which damages both the plug and the pedestal receptacle.
Our RV Electric Hookup Gear
Here is what we carry for hooking up your RV electric, whether at a full-service campground or a state park with minimal power:
→ Southwire Surge Guard 30A — Our primary surge protector. Monitors voltage, protects against surges, and shows error codes before you commit to a connection.
→ Southwire Surge Guard 50A — The 50-amp version for larger rigs.
→ 30A to 120V Adapter Cord — For sites with limited power options.
→ Surge Protector Lock — Inexpensive cable lock to keep your surge protector from walking away.
Final Thoughts on Hooking Up Your RV Electric
Hooking up your RV electric is one of those things that feels intimidating the first time and becomes second nature by the third trip. The process itself takes about two minutes. The important part is doing it safely — checking the breaker, using a surge protector, and not forcing a connection when something looks wrong.
If you are brand new to RVing, our RV camping checklist covers all the essentials you need to have on hand before you leave, including electrical gear. And for tips from fellow newbies who learned the hard way (like us), check out our best RV newbie tips.
If you are planning to camp off the grid without hookups, that is a whole different setup — head over to our guide on boondocking electricity options for everything you need to know about powering your RV without a pedestal.
And whatever you do, invest in a surge protector before your first trip. Campground power is unpredictable, and your RV’s electronics are expensive to replace. We wrote a full comparison to help you choose: Best RV Surge Protector — Top Selections.
Happy camping!
Tony & Gina
RV Boondocker
Related Articles:


